


Focussed Assessment with Sonography in Trauma
Rationale.
THE QUESTION: IS THERE FREE FLUID?
Although it might be obvious, is important to remember that the FAST protocol is specifically oriented to the ‘trauma’ patient, and its main objective is to confirm the presence of free fluid either in the abdominal or thoracic cavities. Additionally, the anterior chest wall can be assessed for the detection of pneumothorax, which is known as Extended FAST.
The presence of massive haemothorax or pericardial effusion leading to cardiac tamponade represents a life-threatening condition that requires immediate drainage. Thus, in unstable patients, reanimation efforts are paramount, and the FAST protocol is used as an adjunct to the primary survey; its implementation may never delay the patient’s reanimation.
On the other hand, it must be considered that the technique has many limitations: It cannot assess retroperitoneal bleeding, and it does not rule out solid organ or hollow viscus injuries. Furthermore, if present, it cannot determine the source of the free fluid or distinguish between blood against other fluids.
WHY USE ULTRASOUND?
As stated before, conditions such as traumatic cardiac tamponade, tension pneumothorax and massive haemothorax may be rapidly fatal if not detected and treated. In the emergency setting, however, the physical examination is unreliable for diagnosing cardiac tamponade and is less than 60% sensitive in the search for significant intra-abdominal injury following blunt trauma. In this context, more than 20 years of evidence backup the FAST protocol as a method to improve the detection of these fatal conditions. It is easy to learn, rapid to perform, and it can be delivered at the patient’s bedside without interrupting the reanimation efforts.
The hemodynamic stability of the patient also determines the FAST sensitivity for injury. In a stable patient with a low probability of bleeding, the sensitivity will be low, whereas in a shocked patient, both the sensitivity and specificity rise. Accordingly, FAST is up to 90% sensitive and up to 99% specific for traumatic haemoperitoneum. Compared to chest X-ray, the E-FAST has doubled the sensitivity while maintaining specificity in the detection of pneumothorax, making it more reliable for screening. In addition, US can be used to guide emergent pericardiocentesis and intercostal chest drain.
CONTRAINDICATIONS & LIMITATIONS.
The only absolute contraindication to performing a FAST scan is the presence of a more pressing problem (airway obstruction, for instance) or an obvious indication for emergency laparotomy (in which case FAST is not needed).
The major limitation of FAST is that gives no definitive information about solid organ or hollow viscus injury, and those patients may require other imaging techniques, such as computed tomography (5). Additionally, an early scan may represent a false negative if sufficient blood has not collected in the dependent areas of the abdomen, whereas a late scan can be falsely negative as clotted blood shows similar echogenicity to the liver. Consequently, caution is advised when evaluating a late presentation trauma patient not to overlook the presence of clots.
Alternatively, it should be clear that other circumstances unrelated to trauma can lead to a positive FAST. For example, the rupture of an ovarian cyst, ectopic pregnancy or the presence of chronic ascites, to name a few. These findings and their approach escape to the purpose of this module.
Settings.
PATIENT’S POSITION
The manoeuvre will be determined by the patient’s state of consciousness and the presence of other injuries. Ideally, the patient should be in the supine position with arms slightly abducted or above the head, that way allowing better visualization of the abdomen's upper quadrants. Alternatively, the arms might be folded across the chest. Still, remember this is likely to be embedded into a trauma team reanimation, with multiple things happening simultaneously, and ideal positioning might not be possible.
PROBE
To achieve an appropriate penetration depth into the abdominal cavity, the transducer must be of low frequency. Both the abdominal and the phased array probes can be used; nevertheless, the latter will allow easier examination of the heart during the cardiac views. At the same time, the linear array probe is ideal for assessing the pleura; however, this can also be done with the other transducers. The curved probe is excellent for having a wide view of the lung bases and abdominal upper quadrants.
The Five Views.

The FAST scan is conformed by five specific views or locations. These are: Bilateral anterior chest, right upper quadrant, left upper quadrant, cardiac subxiphoid, and pelvic sagittal & transverse.
When performing the scan, there is no specific sequence for obtaining the views; the order might vary between operators and be relative to the patient's presentation. Namely, a blunt thoracic trauma should prompt an immediate cardiac view, while a trauma patient presenting with shortness of breath may benefit more from starting by the pleura. What is important, however, is to know how to obtain each view and to be aware of the pitfalls during this process. In addition, it is worth mentioning that among all views, the virtual space between the liver and the right kidney, which is called Morison’s pouch, is the most sensitive for finding free fluid. (6)
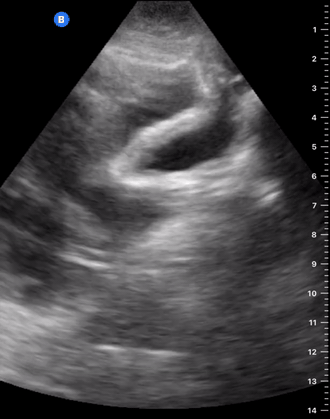
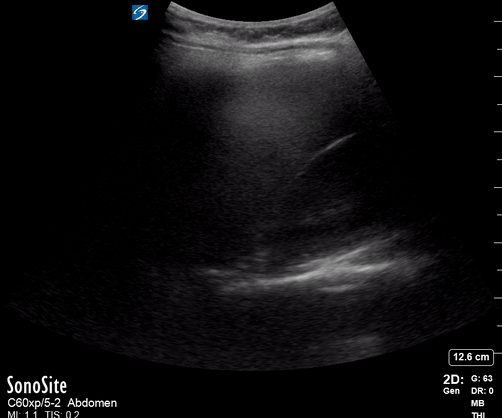
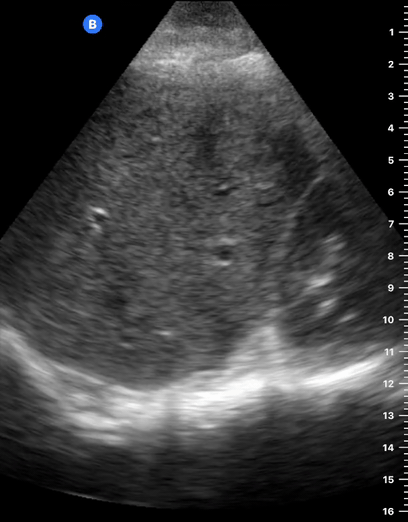
Pelvis
The bladder is utilized as an acoustic window for both pelvic views, so a full bladder is ideal. Under such circumstances, achieving these views should be easy. The interpretation, however, might be challenging since the pelvic structures and anatomical landmarks will differ among genders.
Depending on the amount, there can be free fluid around the bladder or behind it. In women, the fluid will collect in the pouch of Douglas (space between the rectus and the uterus), whereas in men, this will occur in the recto-vesical pouch.
TRANSVERSE
To obtain the transverse view, place the probe in the midline just above the pubic symphysis, with the marking oriented to the right of the patient. This should immediately reveal the bladder in a transverse section. Gently sweep the probe cephalocaudally to visualize the bladder and pelvic organs at different levels, looking for free fluid. Be aware that angling the probe exaggeratedly into the pelvis will reveal extraperitoneal structures such as the iliac vessels and, particularly in men, the prostate and seminal vesicles, potentially leading to confusion.


LONGITUDINAL
From the transverse position, the sagittal view is obtained by rotating the probe 90 degrees clockwise while maintaining contact with the abdominal wall. After obtaining the longitudinal (sagittal) section view of the bladder, search for free fluid by fanning the probe.
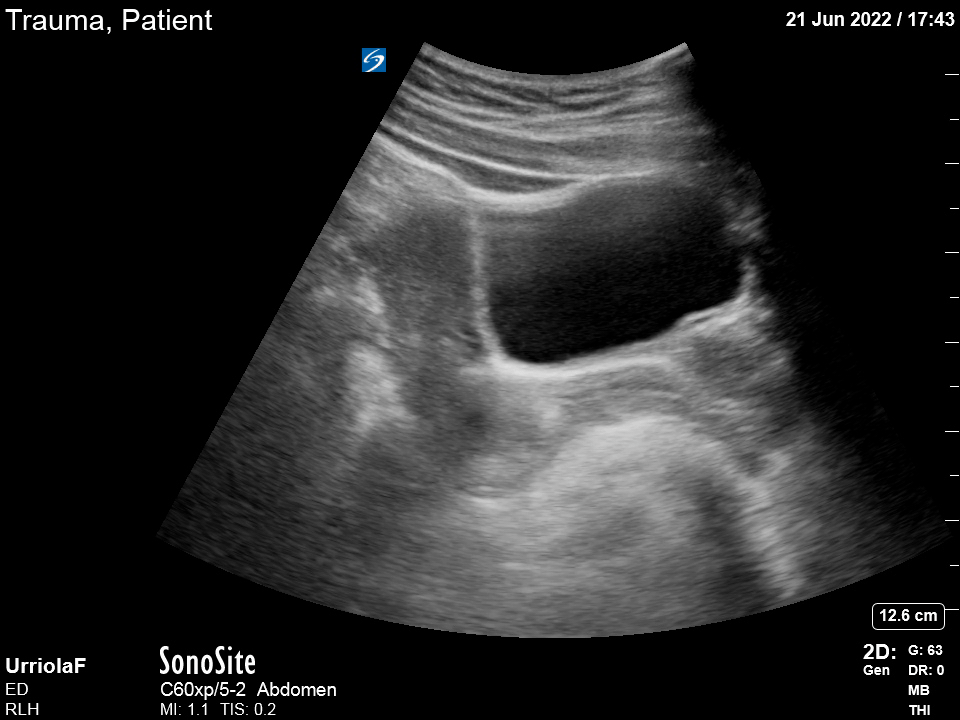
FREE FLUID & PITFALLS
It should be noted that, when exaggeratedly pointing the probe caudally, the prostate will be revealed in male individuals. This is an extra-peritoneal organ and is not considered a part of the FAST protocol. Therefore, finding free fluid adjacent to the prostate does not represent a positive FAST and implies a different conduct. Likewise, in women, it is possible to find “physiological” free fluid during menstruation, which is usually scarce, lies deep to the uterus and should not extend more than 1/3 of its length. The correct interpretation and management of these findings will correlate with the patient’s clinical picture and hemodynamic condition.


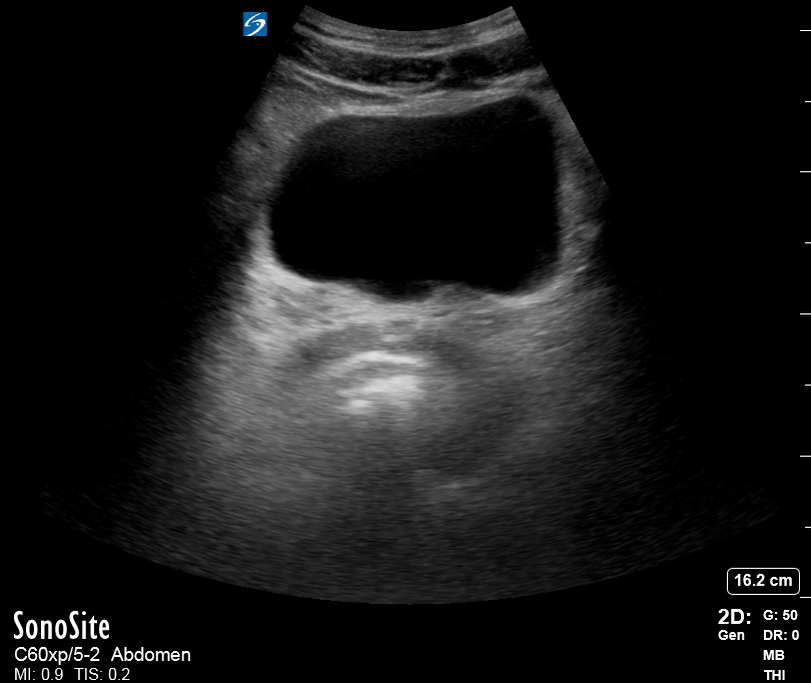
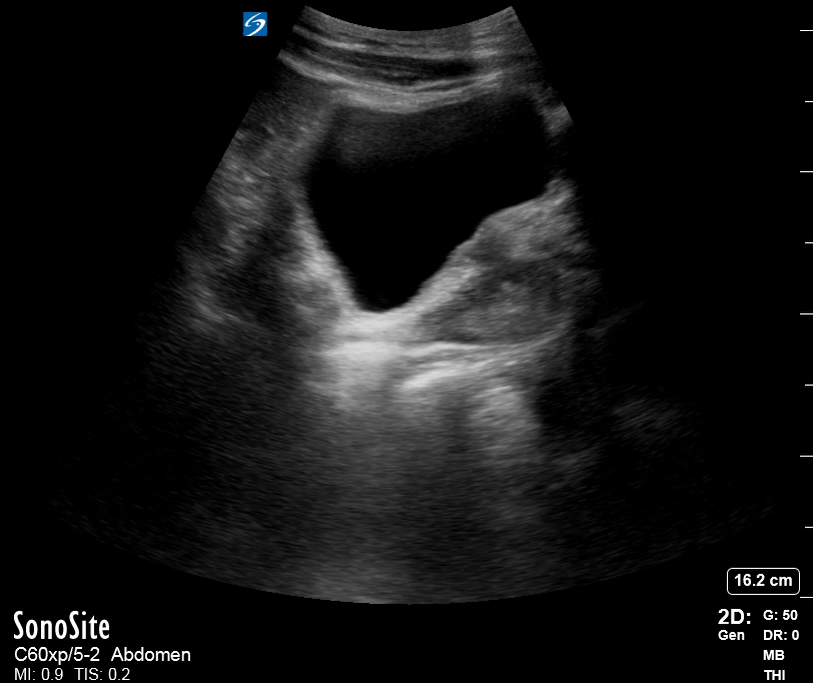
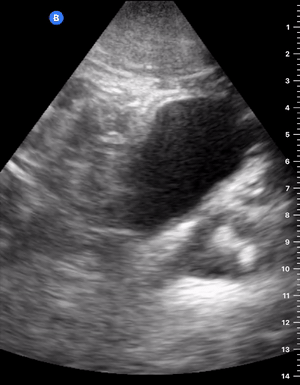
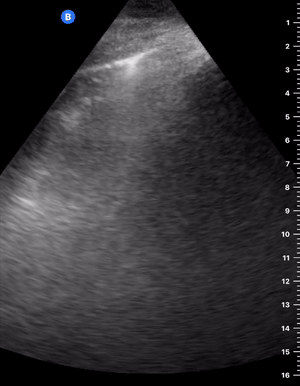
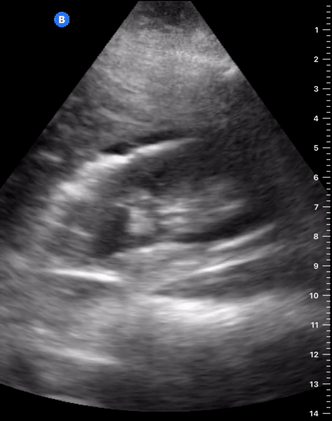
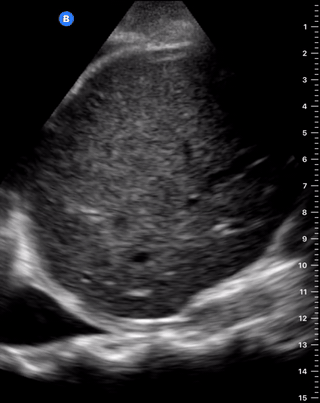
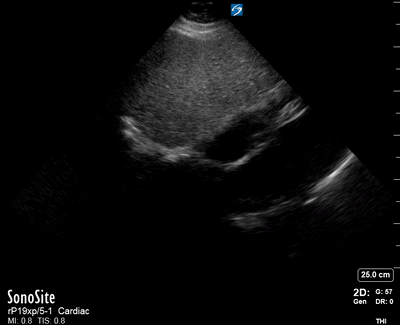
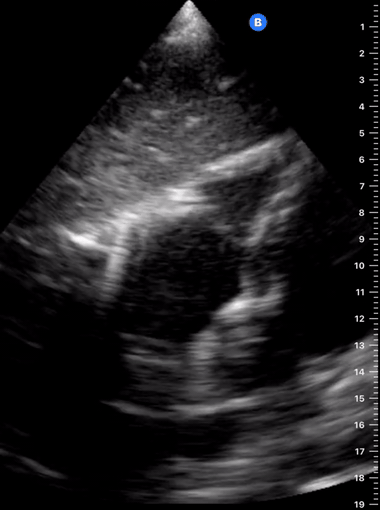
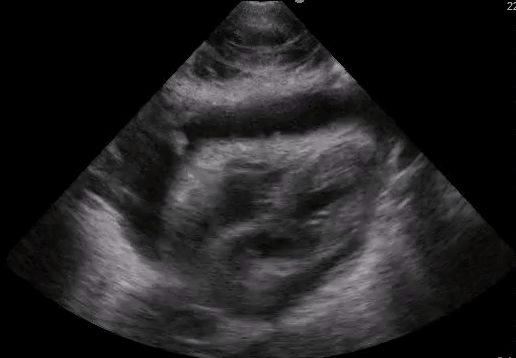
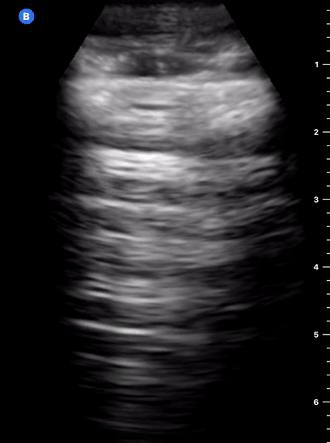
Right Upper Quadrant
MORISON’S POUCH
This view provides a frontal (coronal) image of the abdominal right upper quadrant and requires the visualisation of the right lung base, infra-diaphragmatic space, and Morison’s pouch. The latter is the most sensitive location for detecting abdominal free fluid, which, unless clotted, appears as an anechoic (black) stripe with sharp edges. Within Morison’s pouch, the tip of the liver is the point of highest sensitivity, and it must be included in the study.
Place the probe in this area aligned with the right mid-axillary line and with the marking pointing to the patient’s head. Once the transducer is in place, the liver is utilized as an acoustic window to obtain the view, and it should demonstrate the right kidney, the liver and the diaphragm (highly echogenic). To overcome the acoustic shadows generated by the ribs, you can ask the patient to take a deep breath. Alternatively, you can gently rotate, sweep or angle the probe until a clear view of the structures is obtained.
Once everything is in order, slightly drag the probe towards cephalic to examine the lung base and liver-diaphragm interface. Then, slide back to caudal, exploring the inferior portion of the kidney and the tip of the liver.

RIGHT LUNG BASE
When assessing the pleural space, the air-filled lung obscures the vision of the thoracic vertebrae, and a mirror image of the liver might be seen beyond the diaphragm. Both of these findings are normal. By contrast, the presence of fluid in the lung base provides an acoustic window that facilitates the vision of the vertebrae. This is known as the “spine sign” and confirms pleural effusion.

DIFFERENTIALS
It should be considered that the presence of other abdominal structures can lead to confusion. The gallbladder, as much as renal and hepatic cysts represent anechoic structures that could be wrongly interpreted as free fluid. Is important, then, to be aware of the shape of these structures, as they have round, well-defined edges, whereas free fluid is identified by sharp edges.
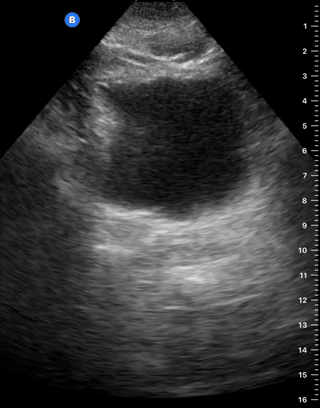
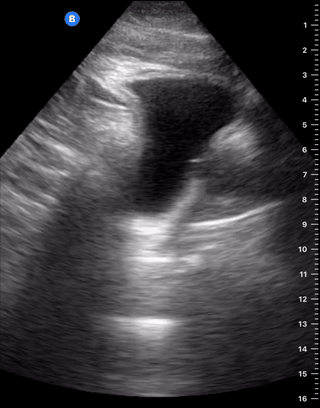
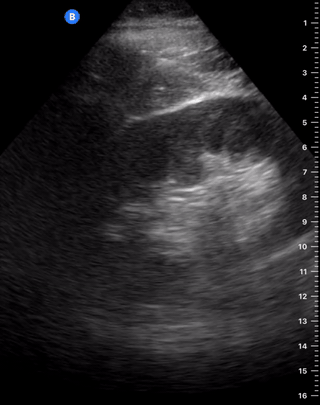
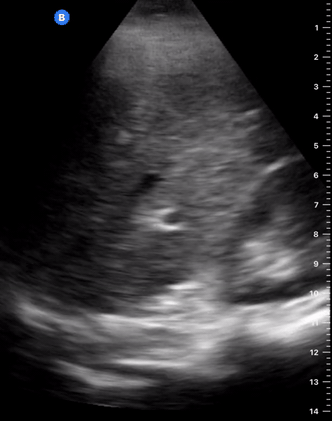
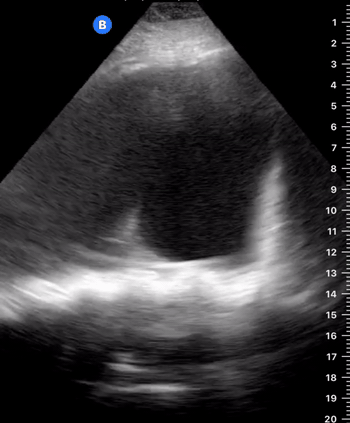
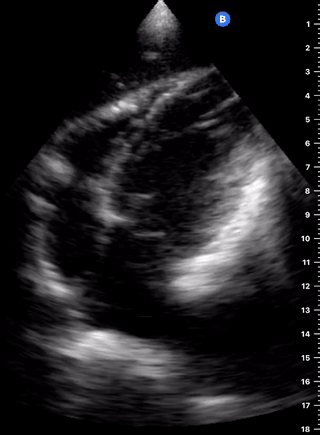
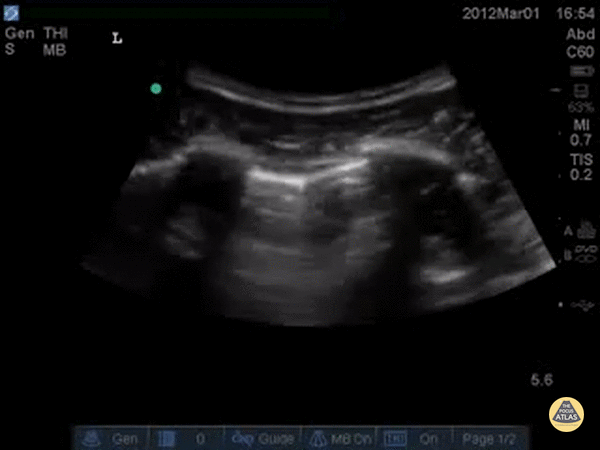
Left Upper Quadrant
LIENORENAL INTERFACE
This view provides a frontal image of the abdominal left upper quadrant and utilizes the spleen as an acoustic window. Obtaining this view is more difficult because the spleen is smaller and more posterior in comparison to the liver. To overcome this, the probe should be aligned with the posterior axillary line. This manoeuvre is also important to avoid ‘gastric sabotage’, that is, interpreting gastric content as free fluid, although the former is usually more heterogeneous and presents movement.
The spleen may be higher than expected and is more difficult to visualize than the liver. The probe can be rotated clockwise, swept and angled so that a clear view of the left kidney, spleen and diaphragm is obtained. In a cooperative patient, a deep breath may also help.


LEFT LUNG BASE
Once the view is achieved, the probe is dragged cephalocaudally to explore the left lung base and the subphrenic space between the diaphragm and the spleen. Free fluid will appear as a black, sharp-edged stripe in the lienorenal interface or between the spleen and the diaphragm.
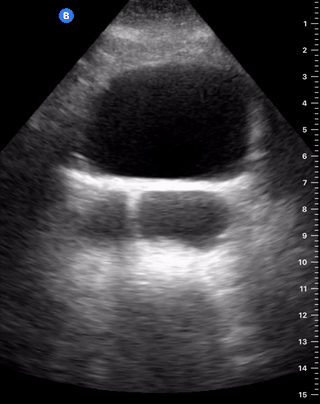
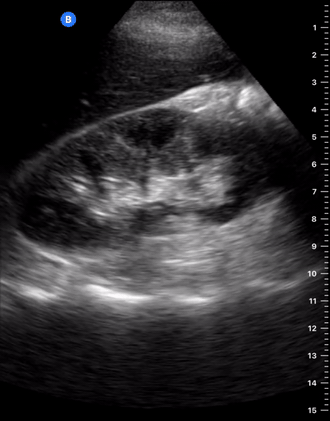
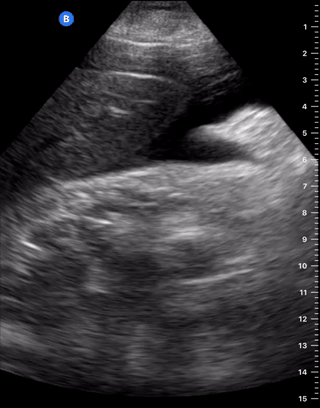
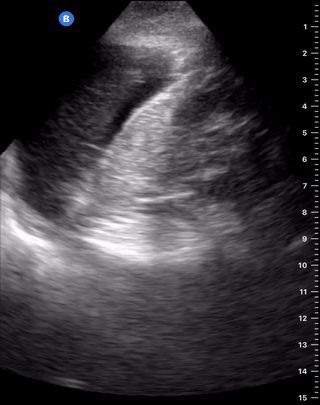
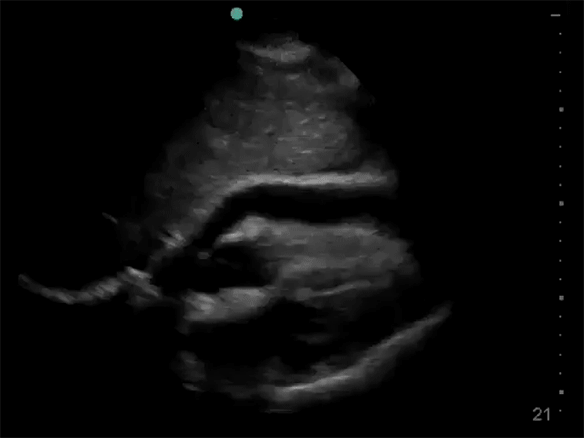
Subxiphoid 🫀
This view delivers a coronal section image of the heart and is mainly used to look for pericardial fluid. The probe is laid almost flat on the patient’s epigastrium, orienting it towards the head. Enough pressure should be applied for the transducer to be placed deeper than the xiphisternum and costal margin. If struggling to get a good image, ask the patient to maintain a deep inspiration to bring the heart closer to the probe. Alternatively, ask the patient to bend the knees to reduce abdominal tension.
Before scanning, the setting should be increased to the highest depth and then adjusted once finding the heart. With the marking properly oriented and utilizing the liver as an acoustic window, sweep the probe in a left-to-right axis until the pulsation of the myocardium is visualized. The view obtained should demonstrate a four chambers image of the heart, where the right chambers are adjacent to the liver and “on top” of the left chambers. The pericardium can be seen as a hyperechoic band surrounding the heart.

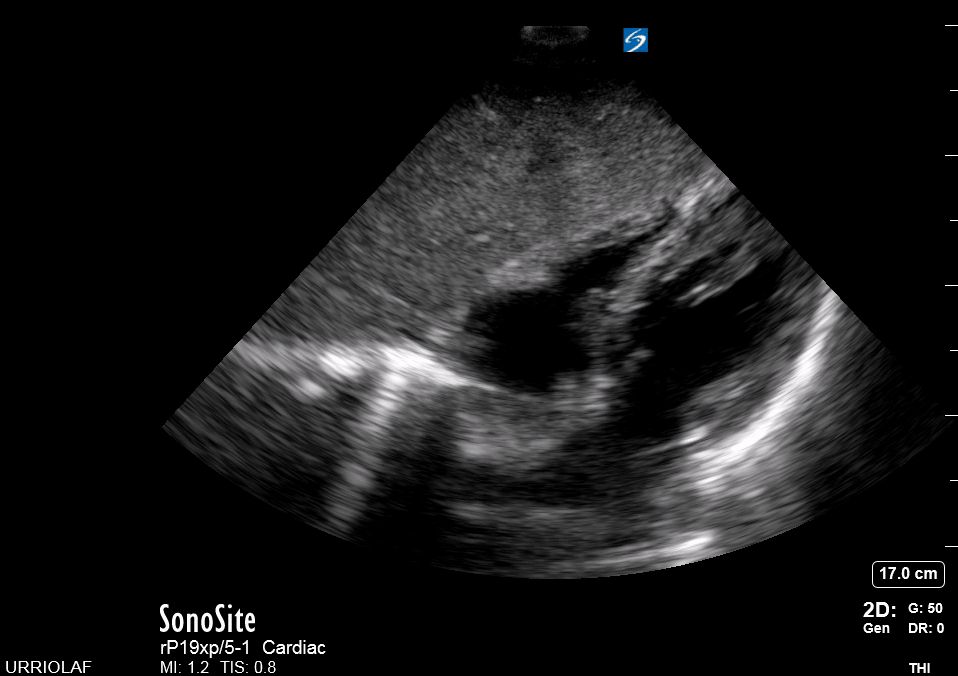
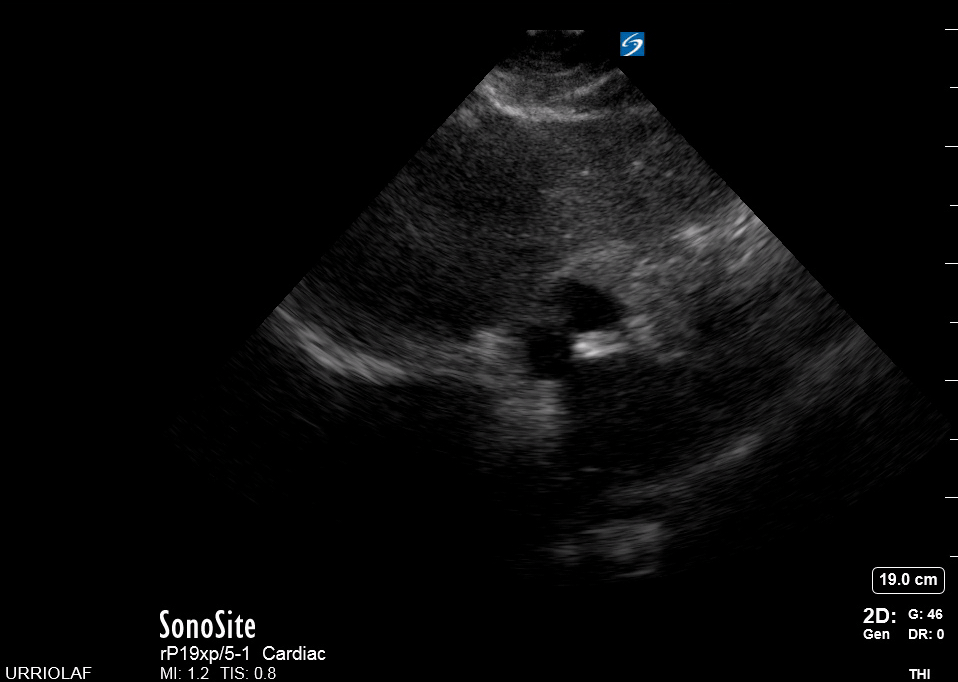


PERICARDIAL FLUID
Pericardial fluid appears as a black stripe between the heart and the pericardium. Importantly, pericardial fluid is not necessarily synonymous with cardiac tamponade. In true cardiac tamponade, the right ventricle will collapse during diastole. However, this can be difficult to assess for the non-echocardiographer. The clinical likelihood of tamponade (chest trauma, hemodynamic instability) must be considered when acting on a positive scan.


In some patients, particularly the obese, it may be difficult to obtain clear subxiphoid images. If simpler, other cardiac views can be used to look for free fluid.
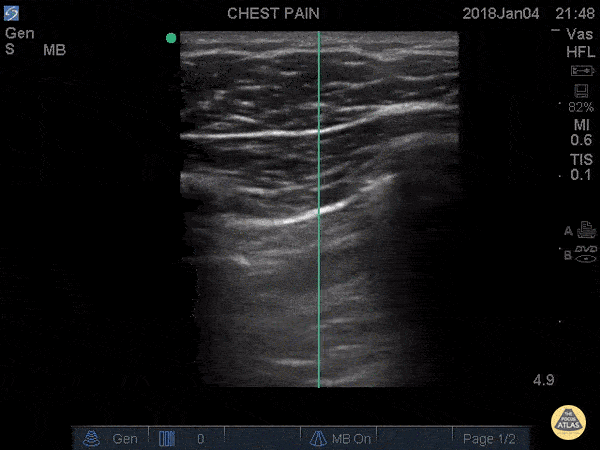
Chest Wall 🫁
Ideally, a linear array probe should be used, but the study can be performed with an abdominal or a phased array transducer. The probe is placed longitudinally in the anterior chest wall, with the marking oriented towards the head. It should be aligned with the midclavicular line between the second and fourth intercostal spaces.
The objective is to assess the presence of sliding between the visceral and parietal pleural layers, seen as a bright hyperechoic line.
LUNG SLIDING
Look for moving, sliding shimmering between both pleural layers. It has been described as an image of “ants marching”. Normal dynamic sliding is easier to identify by centring the lung image on the screen while leaving the ribs’ acoustic shadows at the extremes of the image.
The finding of dynamic lung sliding rules out the presence of pneumothorax. In addition, the finding of the B lines artefact indicates indemnity of both pleural layers and rules out the presence of pneumothorax.


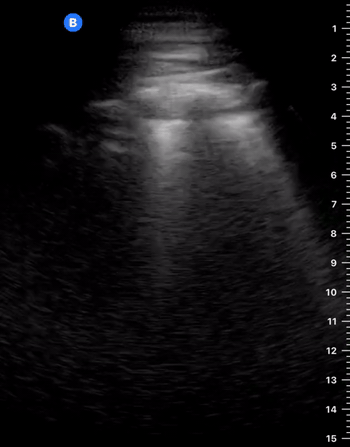
In patients with pneumothorax, the presence of air between both pleural layers will translate into the absence of lung sliding. Such finding, however, is not exclusive to pneumothorax and can also be seen in other conditions such as atelectasis, right main-stem intubation, pleurodesis, or bullae. Be careful interpreting these findings.

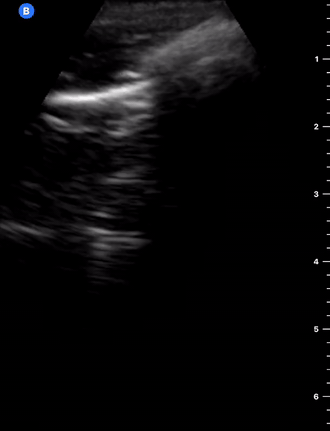


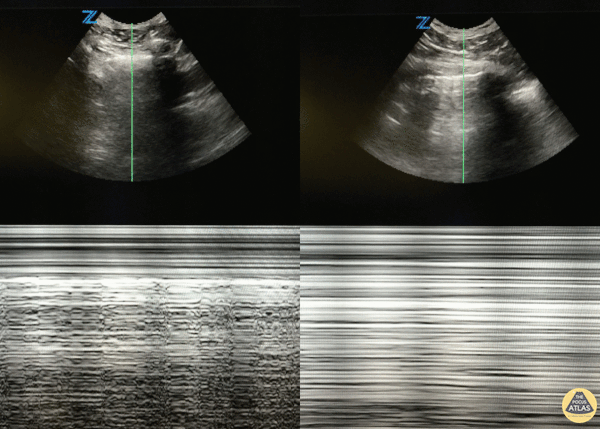
LUNG POINT & M-MODE
The “lung point” can be used to confirm the presence of pneumothorax; this is done by dragging the probe in search of a point where lung sliding can be found. The “lung point” represents the boundary between normal lung sliding and the absence of it. The lung point is 100% specific for pneumothorax.
Alternatively, the utilization of the M-mode, looking for the “seashore sign” or “barcode sign”, can aid the interpretation if you cannot see sliding in B-Mode. Still, remember the “barcode” sign is equivalent to absent lung sliding, but not diagnostic of pneumothorax.


Author: Felipe Urriola Perez | Published: 21 November 2022
Reference.
Bowra, Justin; McLaughlin, Russell; Atkinson, Paul; Henry, Jaimie. Emergency Ultrasound Made Easy, Third Edition. 2022. Elsevier Health Sciences.
Basaure, Carlos; Clausdorff, Hans; Riquelme; Felipe. Ultrasonido Clínico, First edition. 2018. Emergency Medicine Residency Program, Universidad Católica de Chile.
The Pocus Atlas. https://www.thepocusatlas.com
Rose JS. Ultrasound in abdominal trauma. Emerg Med Clin North Am. 2004 Aug;22(3):581-99, vii. DOI: 10.1016/j.emc.2004.04.007
Nishijima DK, Simel DL, Wisner DH, Holmes JF. Does this adult patient have a blunt intra-abdominal injury? JAMA. 2012 Apr 11;307(14):1517-27. DOI: 10.1001/jama.2012.422
David D. Hahn, Steven R. Offerman, James F. Holmes. Clinical importance of intraperitoneal fluid in patients with blunt intra-abdominal injury. The American Journal of Emergency Medicine, Volume 20, Issue 7, 2002, Pages 595-600. https://doi.org/10.1053/ajem.2002.35458